We finished our adjustments in Lightroom and Rosco had put his pawmark on the final version which was ready to be uploaded when suddenly he barked.
<WOOF!>
"What?"
"Stop. I don't like it."
"Why not?"
"Because it's all white there..." and with his nose he pointed to a horizontal patch of sky to the right that was all white. "It wasn't that way before."
"Well it was pretty light to begin with," I said.
"Why can't we use the "recovery" slider?" Rosco wanted to know, obviously thinking about how Lightroom can "recover" overly brightened highlights.
"No," I said, "it's blown out. Basically, nothing is there, so there's nothing to "recover"."
| "Nothing There" |
"That stupid," Rosco said.
"Well that's the way it is," I answered.
<SNORT>
"No," Rosco snorted, "I mean there can't not be anything there."
"What do you mean there's not nothing there?" I asked.
"Because if nothing were there," Rosco explained, "the top part of the picture would fall onto the bottom half because nothing would be holding it up."
I paused.
"You know what, Rosco; you're right! My mistake."
<pant> <pant> <pant>
"When photographers say "there's nothing there" they are being careless. There's no color information in a "blown out" section but the pixels are there. They have to be because from all four corners a digital picture is made up of pixels."
"So why can't the machine put some color information into the pixels," Rosco wanted to know, "isn't that what the "recover" slider was supposed to do?"
"That's a good point, Roski," I replied. "Perhaps it's because the way Lightroom works there has to be some even minimal amount of color in a pixel before it can "recover" it. It's not designed to fix blow outs in the original shot, but blow outs that occur when the photograph is brightened in the adjustment or developing process."
Rosco gave me a "whoopee doo, big-deal, what's the use" kind of look.
"But you know what," I said.
"What?"
"We could do it in our old Photoshop."
<wag> <wag> <wag>
So we brought the picture into Photoshop.
"Okay, Rosco; what we're going to do is pixel paint the blown out white gash at the upper right ... and, while we're at it, we might as well fix the smaller blown spot on the left."
Rosco got into his eager posture.
"Pixel paint could be misleading," I added, "we're not putting pixels into the picture, as you so rightly pointed out. We're adding colour values to the pixels that are there."
"Right," Rosco said affirmatively; and less affirmatively, "How do we do that?"
I showed Rosco the photo-painting tools we would use.
The first was the "burn" tool, which, with each mouse click, progressively darkens a pixel into the next shade down.
| Burning Pixels that ARE There |
"Why is it called, 'burn'?" Rosco wanted to know.
"Because in the old film days, they would shine a beam of light on a spot of the print paper until it burned a darker and darker colour. Remember 'colour is heat'."
Rosco nodded, 'okay'.
"If you over-burn it, no problem. You can use the dodge tool right above to re-lighten it. ... and don't ask me why it's called 'dodge'."
Rosco nodded again.
The second tool, i explained was the clone stamp tool, which we had used before doctoring a couple of photographs Rosco had taken in Mexico. Rosco remembered how it worked.
"You have to be careful how you use it, though; because you can easily end up with a lot of grafted patches of sky from elsewhere that don't blend in naturally or properly."
The third tool, i showed Rosco was the add noise tool, which adds random pixel-spots, making a section look more grainy and less smooth.
"Why don't we just begin with that," Rosco asked.
"Because," i said, "similar to 'recover' the "add noise" has to have some existing noise to add to. It can't just add random spots of white on white.
Rosco nodded, and i showed him how Photoshop offered four patterns of noise (Uniform, Gaussian, monochrome and not monochrome) and a slider controlling the amount.
.jpg) |
| An Example of Extreme Noise |
Rosco opined that since we were dealing with grey clouds, uniform/monochrome would be best; and I agreed.
"Okay," I said, "so the last tool, is the blur tool, which does the opposite of noise, by evening and smoothing adjacent pixels."
"Normally wouldn't want to use smooth after you have just added noise."
Rosco shook his head -- no, no.
"But there are always exeptions..."
Rosco nodded affirmatively.
"So, it's like cosmetic surgery," I added helpfully.
"What's that?" Rosco wanted to know.
"Uh...well, it's like filling up a hole you just dug and patting it on the surface so as to hide the fact that you dug it in the first place."
"Oh..."
"So you think you got it?" I asked.
"Yes!" Rosco said, eager to have it.
Okay, I said and I left the room, leaving Rosco busily at worked
"Don't go overboard," i cautioned, "it's an impression you are creating and it's better to hint at it, than to be too literal."
As I got to the door, I add, "and look to see how other portions of the clouds are acting, so you can mimic what they are doing..."
But Rosco was already hunched over the screen, paw on mouse, tongue on chops and i don't know if he heard or not.
I came back a couple of hours later. Rosco, who was snoozing in his chair, woke up and looked at me expectantly.
"Well, far be it from me to speak for others, Rosco, but i think it's pretty well done"
<wag> <wag> <wag>
"And...?"
"And what?"
"And..and... and..?"
Rosco obviously wanted me to find something else, so i stated at the photo for a while looking to see what else he might have done.
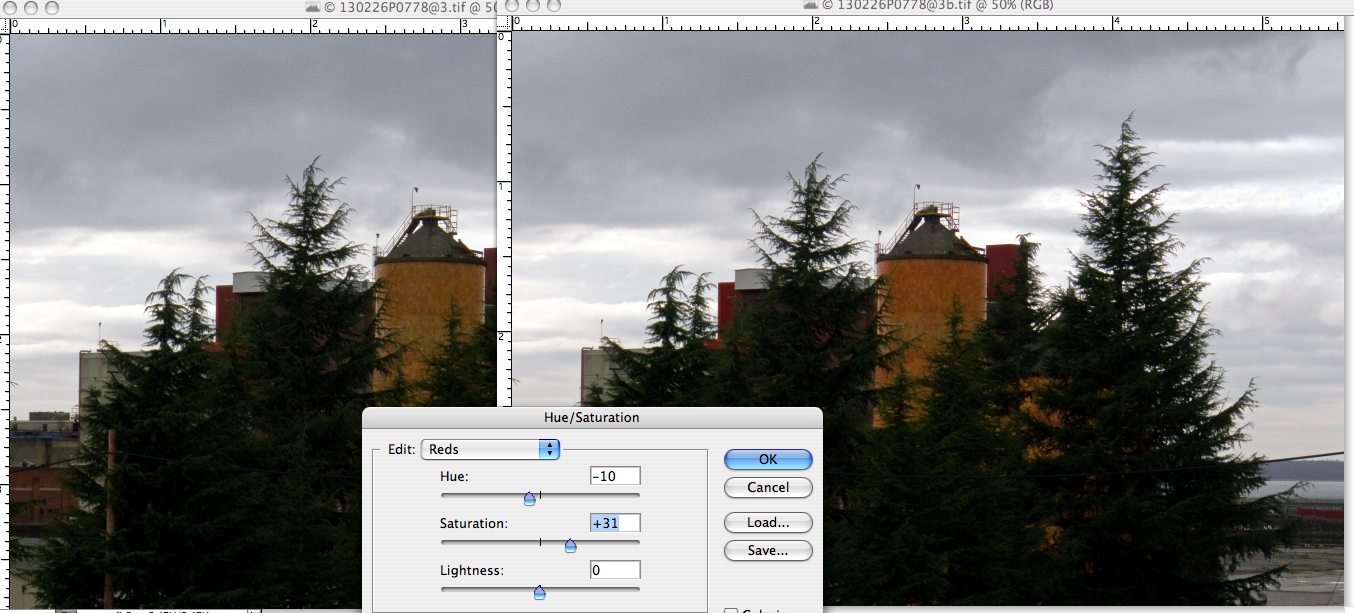 |
| Adding Orange |
"Oh!," i exclaimed, "and you made the silo more orangy! I like it."
<wag> <wag>
It's better not to have blow outs, I said, but if they happen, it doesn't mean the photograph is beyond salvation."
"Salvation?"
"Never mind, Roski; lets go find some bones to chew on."

No comments:
Post a Comment